Day: denture
Not only vampires on Halloween !
by Stefano on Nov.09, 2011, during Special Effects, Events
..old, during the month of October because the demands of cosmetic dental implants have multiplied, and specifically:
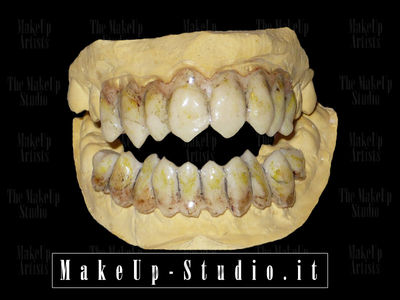
Teeth zombies:
As you can see from the photo of the model, different from that specified in tutorial, to make these prostheses I just shaping the tips of the teeth existing mold. The result was a faster implementation and a much thinner implants, that if one side makes it more fragile and delicate, the other makes it even more comfortable and more subtle.
The prosthesis is double, because it was made for the upper jaw for the lower, maintaining a good chance of closing the mandibular.
It should be noted that increases the realism by adding small details of color and a good polishing.
 |
 |
Vampire teeth:
A small variation on the classic theme of 'vampire teeth'.. I reached the second incisors as well as the canines, and did a little’ sull'attaccatura top of the central incisors to make them bad. The root of the canine was discovered and moved higher up to simulate a greater length of the tooth.
Since the realization we are not bound by specific design, every time you create something new and different, thus adapting the model to the trends of the moment or to a specific request, as in the case of replicas for imitators, cosplayers, etc..
 |
 |
Cosmetic prostheses real:
These false teeth’ have good coverage of aesthetic realism used to make a more pleasing smile that present a problem ugly (Attention: This is NOT a medical implant / but a simple cosmetic dental prostheses. It is therefore intended as temporary cover for use in a movie set, for cosplay, or in the theater, for the time necessary to acting / role of the).
Not create any difficulties in speech but NOT can be used for food and eating / o bere, sleep.
Membership in the mouth is guaranteed by the bill, that is being made on the calculated, fits perfectly with the underlying tooth, without requiring the need for glues or other fastening devices. It is sufficient to remove it gently pull it down. This is cleaned by washing with an antibacterial soap is not colored or neutral color and a mouthwash that contains no alcohol (without letting in immersion) and let it air dry then.
 |
 |
The teeth of the Lola
by Stefano on Nov.07, 2011, during Special Effects, Events

After watching the video, kindly, our Memole posted Teeth on youtube that I realized, Lola, famous Drag Queen of the Art Club of Madame Sisi and friend for a long time, thought it could not be outdone. Of course, with some small change.
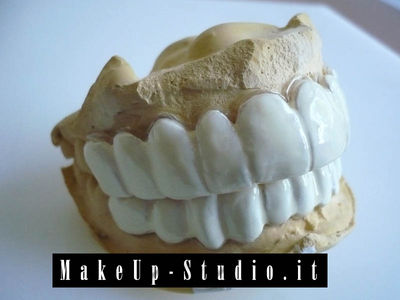
To descend even more into the character it, not at all interested in two sharp fangs as a vampire, but a beautiful arch of white teeth and sparkling, drittissimi, you can put on and off with ease, and without impediment during speech.
So, Once the cast taken, I went to work.
Following step by step the same steps described in the tutorial of vampire teeth, I made the model, mold and positive for both arches, with particular attention that the closure would remain good, namely, that the mouth is closed under the denture (jaw) adasse not to interfere with the upper teeth (jaw).
Here are some photos of the stages of construction.
How to make vampire teeth
by Stefano on Mar.11, 2010, during Special Effects
Here is the backstage for the construction of a denture (it is actually a crown) realism of undisputed, highly effective in making short films, live events, cosplay or just for a change’ their look depending on the mode.
L’ need is available in all stores for dentists or dental, possibly also at a good price online.
Materials needed:
- An impression tray top of the desired size
- Alginate per imprint, slow.
- Gypsum powder.
- Disposable latex gloves.
- Dough or put.
- Vaseline.
- Resin for provisional.
- Pre-vulcanized liquid latex
- Bototalco
- Silicone Impression (it only takes a small amount)
- any water-based acrylic colors
The first step is to take an impression of the teeth. This is done using the special tray and a fair mixture of water and alginate (I use Neocolloid, which is also excellent for making the cast of the face or any part of the body).
Once the slurry has been stabilized and hardened (by 3 to 5 minutes) you can clean the mouth and fill with a mixture of water and gypsum. Council to do this in two stages: the first with a very liquid mixture that is stratified throughout the footprint, It need operation during which tap the table, is to remove small air bubbles present, that in order to enable the plaster to make every detail present on the mold.
The second, every few minutes from the first, a little more dense, as a filler.
After a period ranging from 20 minutes 2 hours, depending on the plaster you have chosen, Your positive is ready.
If you have a latex liquid, I recommend using it to coat the stamp with a light film, Dab with talcum powder: This will make it much easier to loose the prosthesis as well as give a slight 'game’ made to the crown, that make it more comfortable and durable.
On the positive thus created and covered by a layer of latex, it is now possible to model your new teeth with the plasticine or clay.
After work cover everything with a thin layer of vaseline, that, as well as allow the posting of the counter that we will achieve, is also useful to give a good polish to the whole tooth.
The prototype so grossed must be placed in the freezer for a couple of hours, so that the plasticine or clay to take a good consistency.
After such an interval may be made to make the mold with key (that is, with a detail, such as a small pin located on the palate) allowing for the repositioning of the same counter.
To accomplish the latter you can use different types of materials, but I have experimentally verified that the best is the silicone impression (Flexitime EasyPutty), that breaks away from the plaster once catalyzed, is flexible and allows slight undercuts, separating the resin and is reusable !
Wait until the counter that you cast or molded on the model is hard, and disconnect it from your work again. Make sure that the work done so far has managed well and remove the dough from the positive (and if present in trace, also from the negative).
Now comes the most delicate moment, the realization of the real prosthesis molding.
Given the nature of the used substances near, I suggest you work in a well ventilated place and using latex gloves.
Liquid and powder (I used a medium color Duralay clear) be blended in appropriate quantities (about 1:1) and then poured into the mold, closed immediately with good positioning with the key you created earlier. Obviously a soft mold will make it much easier being removed.
After a variable time between half an hour and 2 hours depending on the resin used can be removed to cut the crown, remove small imperfections, lucidarla, and colored end.
In some of the attached pictures you can see how he left a large area of coverage on the gums. This is not always necessary, rather, often the most realistic prosthesis cover only the teeth. A skilful use of color and a couple of coats of clear gloss will give your life to finally sighed work.
 |
 |
 |
Plaster cast |
Model in clay |
Controstampo in silicone |
 |
 |
 |
Prosthetics printed |
Finished prosthesis |
Prosthetics colored |


